Friday, November 30, 2012
The Day the Worms Came
So. I got another pet.
Well, technically, I got about 900 other pets.
900 worms to be exact.
I'm not even kidding. I bought worms off the internet. But not just any worms. Oh no. These are the goose that laid the golden egg kinda worms, except, replace goose with worms and egg with worm poop...
Perhaps I should explain further.
Worm castings, or "black gold" as some call it, are one of the best fertilizers and soil correction supplements around. They don't have to be trained. They don't run away. They make zero noise and produce no dander. They require a little prep work, but after that you just feed them and keep them damp. Then after a few months of eating, digesting and reproducing, you have yourself a nice amount of composted worm fertilizer. What more could you ask for in a pet??
Alright, they don't wear sweaters... but you can't win'em all.
For anyone who may also be interested in the benefits of worms- whether for a garden or a classroom pet- here is how we started ours.
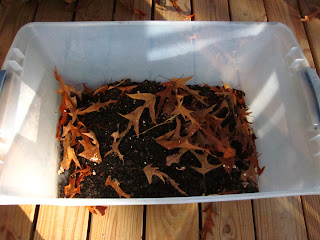
First we had to find a container to house the worms. You can buy kits from several places online or your local garden center. I'm cheap so I didn't do that. I had this one laying around since I started our seeds last year. It wasn't really the right size for the seeds, too deep and not large enough across the bottom, so I am using it for worms.
Then I added the bedding- that's shredded newspaper, some leaves from the yard and some garden soil- not potting soil, real live dirt. It was hard to find real dirt and I was pretty upset about having to delegate some of our precious dirt to the worms, but I figure the return will be worth it. **The lack of decent soil is why we got the worms. We are trying to compost in as many ways as possible to try to correct our sandy, clay, soil.**
Then I put in some crushed, cooked egg shells. We used the eggs for pasta so they were raw. I had to cook them by putting them in water in the microwave for a few minutes, but this wasn't really a big of a deal.
I gave the box a gentle shake to mix the components.
And added my worms.
Let me tell you, it was super exciting.
** I had to do crazy things to the expose setting so you could actually see the worms in these pictures. Please excuse.**
Then I left the box out in a sunny place in the house to encourage the worms to dig in. They actually moved really fast and soon it just looked like dirt.
So now all I have to do is mist the soil every few days (damp, not wet) and feed them regularly Red Wigglers (our worm breed) can eat about half their weight in food each day. That means that the two pounds of worms we started with will need about a pound of food a day. They can eat bread, fruits, veggies, egg shells, and sometimes coffee or tea bags.
Basically, about half of the food we throw into our regular composter will now be used to feed the worms. The compost in the back is a fairly slow process because it is so large and we mostly use it for "big items" like leaves, grass, garden scraps and the unusable leftovers when we can. The worms will take care of the smaller, day to day composting from cooking and cleaning out the fridge.
And in a few weeks we should be able to harvest our first worm castings! Who's excited?? I'm not sure where we're going to put them... probably into the big composter actually. But then straight into the garden!
Now who's ready to come watch these guys (and girls) go?? Anyone up for a worm party?
Subscribe to:
Post Comments (Atom)


No comments:
Post a Comment